
October/November 2013
Create a wind map for all deer stands
Most hunters know that deer have an exceptional sense of smell. Once a deer’s nose detects one hint of danger, the game is often over for a hunter. Producers of consumer deer scents and human odor eliminators have capitalized on this and have become a multi-million dollar industry. There are not many hunters out there who haven’t bought at least one bottle of doe-in-heat urine!
Unfortunately, there are many hunters out there that think if they spray down with human odor remover, dab on some deer urine, and wear their “scent concealment suit” that they do not need to pay attention to the wind. Regardless of scent free efforts, my experience has been that if a deer gets downwind, chances are very high that it will detect me. This is not to say that these efforts are fruitless. One of the best ways I have found to assist in “scent management” and help minimize hunting pressure on a property is to create a wind chart for all hunting stands to help hunters make good decisions on where to hunt. A wind chart is simply a table that lists wind directions across the top (e.g., N, NW, NE, S, SE, etc.) then lists the stands along the left column. In the row for each stand a checkmark is placed in each of the winds this stand can be hunted. On flat land, this task is relatively simple. The true wind direction is relatively constant across the landscape. However, on properties with rolling or steep topography, the true wind direction is often disturbed altering its direction by hills, bluffs, valleys, etc. When this happens, the wind direction at a particular deer stand may be 180 degrees from that of another stand somewhere else on the property. In this situation, the best method of determining which wind is best for specific deer stands is to visit stands on various true wind directions and record how it is reacting at that stand. Once complete, a wind chart makes deciding where to hunt easier and can significantly improve hunting experiences and success.
Install honeysuckle management units for additional quality browse.
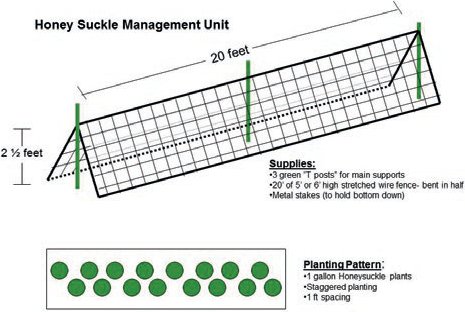
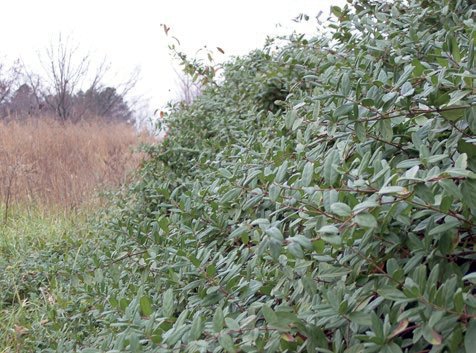
A honeysuckle management unit is the technical name for a managed honeysuckle patch. By managed I mean it is fertilized and kept free of undesirable weeds. If you have ample honeysuckle patches on your property, select a few to concentrate your management efforts. Manage the same patches throughout the year. Ideally, these patches will be in locations near hunting stands. Some landowners create honeysuckle patches in their food plots by planting a staggered line of one-gallon containerized honeysuckle plants. One trick that I often recommend is to create a wire fence tent to place over the patch. Because of the added fertilizer and care, these patches are very palatable and deer will literally eat the plants to the ground. The wire tent only allows deer to eat portions of the honeysuckle that grow outside of the “tent” which saves the plant. Make sure to use wire fence with a small enough mesh to prevent deer from being able to eat inside the tent (~ 3″ fencing works well).
Clean and service walk-in cooler
This is a task that is often overlooked until the first deer is harvested, then to find out that it is not working. If you are fortunate enough to have one, servicing and preparing the walk in cooler should be on your pre-season task list. As with any area where food is stored, the interior of a walk-in cooler should be sanitized regularly. This includes the floor, walls, racks, meat hooks, etc. A plastic 2 gallon hand-held pump up sprayer is a great tool to apply disinfectants. Drains should be inspected, cleaned, and disinfected as well. Be sure to inspect weather stripping along the door and threshold. Air leaks due to the door not sealing well can reduce the life of the compressor as it has to run more often to cool the air. Lastly, give the cooler a good test run. Turn it on and let it run a day or two to make sure all is well and that the thermostat works.
Keep disturbance on property to a minimum
While there are many things that need to be done on a hunting property during early fall (like activities included in this calendar), making attempts to minimize disturbance on the property before and during hunting season will result in better hunting experiences. Disturbances may include activities such as 4-wheeling, joyriding, full-scale scouting missions, hunting stand preparations, repeated checking of dove fields or duck ponds, heavy equipment operations, and general noise/disturbance while on the property. As you would expect, most wildlife respond negatively to excessive disturbance. If you are actively managing your property there are things you must do that will add “disturbance”. But if you want to maximize hunting experiences, make efforts to minimize the impact of these disturbances.
Coordinate food plot planting with good soil moisture
Generally speaking, October through early November are the best months to plant fall food plots in the Southeast. The goal is to plant when conditions are favorable for maximum seed germination and plant growth. Don’t fall into the trap of planting too early.
Unfortunately, many landowners and hunters plant in early-mid September. Some hunters, particularly hunting clubs, even pick a specific weekend that food plots will be planted well ahead of time and do not have a clue what the soil conditions will be like….but they plant anyway because “that’s when we plant every year”. This is often a very dry period across the Southeast which will lead to food plot failure. If planted in September and you are lucky enough to receive adequate rainfall, food plots may grow rapidly which will result in over mature (i.e., high/tall) food plots by the time hunting season arrives. This is very common when an abundance of acorns are present (which seems to be the case this year in many areas of the Southeast) because the deer use of food plots is limited, allowing them to grow. There is also a higher chance of army worm problems if temperatures are still warm. In most areas of the Southeast more consistent rainfall events begin in October as cold fronts move south. Planting “later” (meaning in October-November) will also result in young, tender food plots that are very attractive to deer and other wildlife during hunting season. Very young and growing food plots are attractive to deer. When planted under the right conditions (adequate soil moisture), plots germinate quickly and deer will begin using them within two weeks after planting. My point is to not feel rushed to get seed in the ground and focus on planting under favorable conditions. There have been several articles related to food plots and planting strategies in past issues of Wildlife Trends. Refer to these articles for more detailed information.
Build and install enclosures on your food plots.
Enclosures are simply small fenced structures that are placed on food plots to observe or monitor deer use of the plot and food plot success. The enclosure does not have to be big, just enough to prevent deer from eating a small area of the food plot. In general, enclosures are nothing more than a short length of 4 foot hog-wire fence that is “rolled” and fastened with either wire or zip-ties to create a tube with a 2-3′ diameter opening. The enclosure can then be placed on a food plot and fastened to a stake. Enclosures are particularly helpful if you have a high deer density. I’ve often seen food plots in areas with a high deer density appear as though the plants never germinated. The landowner or land manager is beating himself up because he is thinking that he did not plant the food plot correctly, or that the particular seed mix he planted isn’t growing well on his property. The fact is that deer have literally eaten the plot to the ground before it had a chance to grow (in this case, I would consider installing more food plots or, depending on your goals, planting lead to reduce the herd!). A food plot enclosure will help answer these questions.
Hold a preseason meeting with your hunting club or people that hunt your property to discuss the progress of the deer management program and harvest strategies planned for the upcoming season.
Holding a preseason meeting to discuss the deer management program and deer harvest plans for the upcoming season will ensure everyone is on the same page before the season kicks off and hunters head to the woods. Hopefully, you have been collecting harvest, hunter, and population data regarding the deer herd. Use this information to assess the status of the deer herd and how the herd has or is responding to your management strategies. A preseason meeting is a great time to review this information, make decisions for the upcoming season, and share with the group of hunters using the property. As a biologist, I often present this information to hunting clubs or landowners with recommendations for the upcoming season. These meetings are most effective if held just prior to hunting season to ensure the information is fresh on hunter’s minds. This is also a great time to review general rules for hunting, discuss housekeeping items around the camp and property, and develop management and/or maintenance project lists. I often see these meetings tied into a work day or work weekend at the property.
Conduct a camera survey to assess the status of your deer herd.
Monitoring the status of your deer herd is the backbone to the success of your program. Collecting and recording harvest data (weights, measurements, ages, etc), hunter observation data (number, sex, and quality of deer you see while hunting), as well as population surveys provide information about the deer herd that will allow you to make sound deer management decisions and adjustments in strategies where needed to accomplish your goals. Without this information you are simply guessing. If you are like me, you spend way too much time, money, and energy managing your property to just guess on how many and which deer to harvest this season. I want to know. Conducting a camera survey is the best tool available to assess the status of your deer herd (number of deer, buck quality, fawn recruitment, etc) and make buck harvest decisions before you head to the woods. The best times of the year to conduct a deer survey is when natural food availability is at its lowest which is generally late summer/early fall and late winter before spring green up. Most managers conduct fall surveys (September through early November) because they also use the photographs to make buck harvest decisions before hunting season. We generally try to conduct our surveys soon after bucks shed velvet but before the majority of acorns start to drop.
Regardless of whether you conduct a full scale survey or simply use cameras to scout, photographs from trail cameras are a great tool to assess buck quality and make buck harvest decisions before the moment of truth in a deer stand. I have seen many young bucks with great potential make it another year because they were placed on a “do not shoot” list. If you are using the trail camera photographs to make buck harvest decisions, late summer or early fall is when you need to deploy them.
Use deer hunting observations to help you better manage the deer herd and assess hunting strategies.
Quality deer management involves more than producing quality bucks. It should create quality hunting experiences as well. Collecting hunter observation data (where hunters record the number of deer and quality of deer they see while hunting) allows you to monitor the hunting quality of the property. Adjustments in management strategies can be implemented accordingly to promote quality hunting. Additionally, hunter observation data is a great (and cheap) method to help assess some parameters of the deer herd. Although a camera census is, by far, the most accurate way to collect information regarding the deer herd, trends in population parameters such as the adult sex ratio, buck quality, and fawn recruitment can be monitored with hunter observation data. However, for this data to be meaningful, it must be collected accurately each year to track trends in the data. Hunter observation data is also a good way to assess hunting strategy success. When recording this information hunters generally record when and where they were hunting (e.g., PM-food plot, AM-woods, AM-clear cut, etc.) and what they saw. When the data is analyzed, it provides insight as to which hunting methods and which areas are most productive for the property. For example, through hunter observation data collected throughout the season, you may find that hunters saw more mature bucks per hunt in thinned pine stands in the morning verses the afternoon. Thus, you can adjust your hunting strategies to enhance the productivity of your hunting time.
Flood duck ponds to “full pool” by early-mid November.
Monitor water levels in duck ponds as fall arrives. Many of us in the Southeast have been fortunate and have gotten abundant rains so far (some of us got too much!). However, too much water too early can be bad for growing duck pond crops/plants. Water control structures allow managers to regulate water levels and are valuable tools when a rain event such as a tropical storm comes through. Once your crop matures, allow ponds to slowly flood to “full pool” as November approaches. Ideal water depths for dabbling ducks such as mallards, gadwalls, wood ducks, etc. is 12-18″ with pockets of 4″-6″ depths. The reason to have ponds flooded 2-4 weeks before the hunting season opens is to give ducks a chance to find your ponds and get used to using them. Flooding too early (more than a month before the season) may result in seed deterioration resulting in less food later during hunting season. For good hunting throughout the season, do not over-hunt your duck pond and allow a “rest” period between hunts. If you have several duck ponds, designate one as a “no hunt area” to provide a place for ducks to loaf. This will keep them on your property.
Make final equipment preparations for duck season.
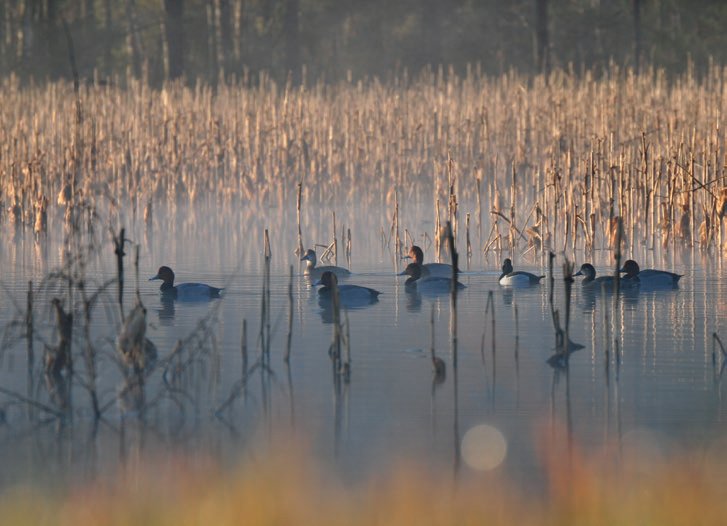
By early November, flooding strategies on managed duck ponds should be well underway. Teal are generally the first to arrive in September followed by the fall migration of other waterfowl. In most areas the general duck season opens in November. There is nothing worse than looking forward to the first duck hunt and before daylight of opening morning realizing that your waders have dry rotted or that your duck blind is full of fire ants! Make preparations now to ensure you are ready to have a fun and successful hunt. While everyone’s situation is different, a few items I recommend checking include waders or rubber boots, boats (lots of things to check here), paddles or push poles, lights, decoys and rigging, obstacles along paths to and from duck hunting blinds, the blinds themselves, platforms for dogs, and shotguns…to name a few. Trust me; I say all these things from experience!