
I remember it as vividly as if it were yesterday. As I walked across the soft, dark soil, the earthy aroma penetrating my nose, the sun just setting over the tree tops after a long, hard day of food plot work, I could just picture in my mind all the deer that would be sneaking into this remote food plot, completely surrounded by dense, rolling hardwood- hills to dine on the special clover mix I had just planted. It had been one of those days where I sweat so much I looked like I had been rolled in dark flour, and my jeans had gotten so heavy they hung low as I walked toward my buddy to talk about the job well done. We had purchased this property a year earlier and had cleared this old log deck area the hard way with chain saws, a bush hog, a scraper-type grader box and hand wielded axes, picks and shovels to scrub the thousands of roots that were showing. “The 58″, as we call it, is nestled smack-dab in the middle of a huge hardwood ridge area that consists of nearly 800 acres of beautiful prime deer and turkey country in one of Indiana’s top trophy-producing counties. We had hand limed and fertilized the soil based on ignorant guesswork and then roto-tilled the plot with a 3-point unit behind my tractor so thoroughly that the soil looked like a blanket of fluffy, dark-brown humus. As I walked back and forth across the plot broadcasting the expensive clover seed out of my over-the-shoulder hand-crank spreader, my boot prints left tell-tale signs 4-6” deeper than the surrounding soil of exactly where my previous pass had been. After driving out to the truck and trailer in the dark, we loaded up and strapped down the tractor and various implements. We were dog-tired, yet felt satisfied and energized about what would surely result from all of our thoughtful planning and hard work. The hour and half drive home late that night was passed with only occasional words, as our minds were filled with the visions of the monster bucks we would certainly grow and see later that fall.
A few weeks later I returned to check on the progress of our remote plot. I walked back the long winding log road nearly giddy with anticipation to see the carpet of green that was about to greet my eyes. As I rounded the last bend in the road my heart sank as I took in the scene before me. Not only was our labor of love not a lush green carpet, but I had to strain my eyes to see any green at all. As I walked into the opening, I could see just a few scattered long, gangly strands of clover, lying over on the ground. Their thin stalks not even strong enough to support the plant as it emerged from the soil. Deer tracks were evident everywhere, as they too appeared as holes punched into the top of a chocolate cake. As I squatted down in confusion and bewilderment, my mind raced for explanations. I had done exactly as the bag had instructed. I broadcast the seed on top of the ground as it is recommended. I even timed the work day perfectly, having gotten a rain a day or two after we planted. The seed company stated that the rain would work the seed into the ground at the proper depth. This, according to them, would eliminate the need for something called a “cultipacker” since the rain would help cover the seed with soil to get it germinating. “Too much shade” I muttered to myself. “Maybe not enough lime.” I was offering myself plausible explanations for this apparent failure as I walked through the property on my way back toward camp. Funny thing was, the explanation was right there before me, I was just too naïve and inexperienced to see what it was trying to show me.
That was nearly 18 years ago, and boy have I learned a lot since then. Most of it has been the hard way. My buddy and I still own that property, and that early food plot, along with two others on that piece have since been enlarged through timber harvests and more hard work to nearly 2 acres in size. What those gangly little clover plants were trying to say was that they exhausted every energy reserve that they had in the little seed trying to fight their way up through that loose, fluffy soil that had looked so good to me. The deep tracks that both I and the deer were leaving in that ground were another huge indicator that the soil needed work before I wasted that precious seed. Of the scattered few clover plants that I did see, thousands of others had died in the soil, fighting to get up and out of the ground, but never made it. What I read on that seed bag was that I needed to plant the seed on top of the ground, and that the rain would work it in. While this was true, what I didn’t understand was that their recommendation of using a cultipacker was not to merely ensure that the seed was adequately “covered”, but to guarantee that it didn’t get planted TOO DEEPLY!
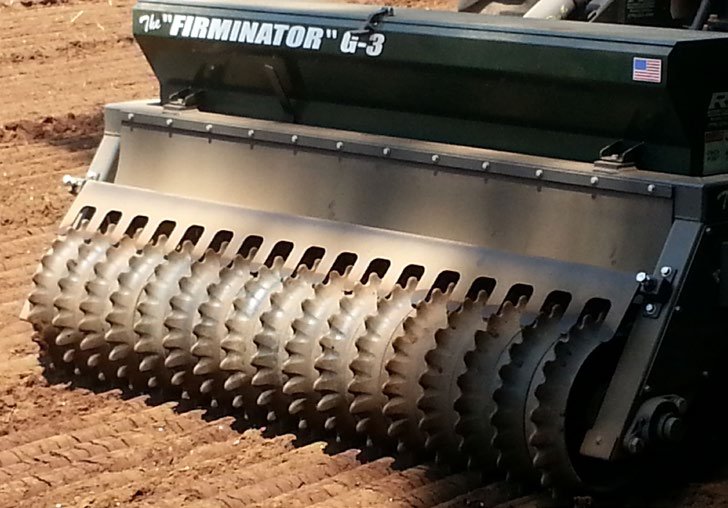
Through my experiences and engineering background I developed and brought to market the “Firminator” food plot implement back in 2003. I felt that there was a definite need for a high quality, heavy-duty combination use implement that saved installation time by reducing the number of individual pieces of equipment a person needed to do top-notch installation jobs. Less pieces of equipment also saves money along with trailer and storage space. Additionally, with the cost of quality seed, having a precise metering system to dispense the exact amount of seed pays big dividends over the years. Finally, producing a high quality food plot the first time will avoid the scenario described earlier which cost me a full season of lost forage. The idea of this implement was actually formed literally from the ground up starting with the all-so-important cultipacker. The Firminator’s name itself was derived from the importance of a properly prepared seed bed. Having experienced the failures of improper preparation, I know that there are multitudes of guys out there working their tails off, not realizing the importance of this vital piece of equipment.
During the initial years of showing our products at sports shows across the Midwest I talked with literally thousands of guys about their food plot programs, both successes and failures. We also had been selling food plot specific commercial seed blends during that time as well. I immediately began to recognize a pattern developing in all of those “failure” stories and it was exactly the same scenario each and every time. It would usually start with a man approaching me and saying something like “Hey, I tried some of your seed last season, and it didn’t come up at all.” I would always ask first if they took the time to do soil testing and if they had followed the recommendations. Sometimes, that would reveal a problem, but often-times they would confirm that they had indeed done that. Next, I would ask them to describe in great detail step by step how they actually planted the seed. Without a miss, all of those failure stories involved guys spreading seed on loosely disked or roto-tilled soil and many times disking or dragging something around to “cover the seed”. Another interesting link I noticed is that sometimes they would mention that only one type of plant would emerge from some of those plantings. After confirming that the plant they were describing were plants in the Brassica family I was able to make my case. In my experiences, I have noticed that Brassica plants are more tolerant of excessive planting depths. I must note that what I am talking about here are clover and clover and chicory blended products that just do not tolerate depths of more than a quarter of an inch in the soil. Obviously, some cereal grains, corn, beans, peas, etc. actually require adequate planting depths to show their potential. More on that later. To a man, when it was described of the importance of firming down the seed bed PRIOR to planting, you could see the light bulb come on. With all of this being said, I thought it would be a good idea to cover some of the obvious reasons why a cultipacker is “such a big deal”, and still a few other reasons that you might not have ever considered!
Firming of the Seed Bed
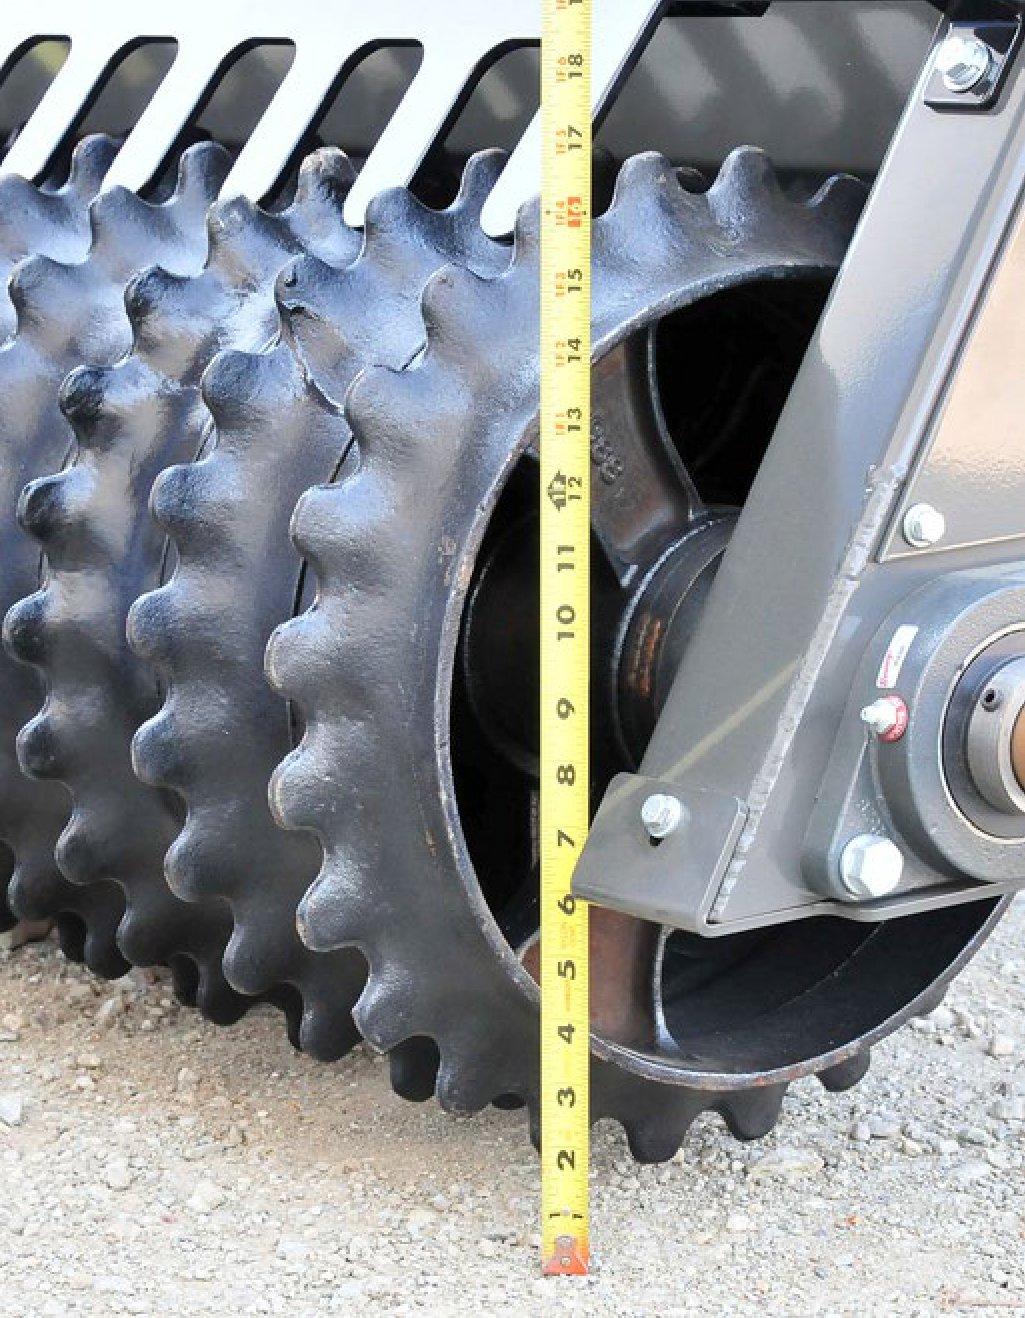
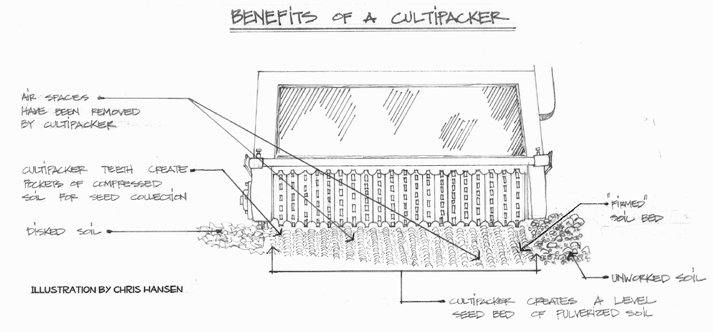
This by now will probably be the most obvious reason. A cultipacker consists of many individual cast-iron wheels which roll on an axle across the ground. They are very heavy! As the assembly rolls across a newly disked or roto-tilled soil, the heavy cultipacker compresses much of the air space from the soil to eliminate settling after rain begins to take its affect on the ground. The design and shape of the individual “wheels” on a cultipacker assembly facilitate the pressing both vertically and horizontally of the soil underneath. (See attached illustration) This is critical to ensure that the smaller seeds do not fall down into the pores and openings found in a newly-worked field. In the earlier story, if I had pulled a cultipacker across that roto-tilled food plot, the soil would have nicely firmed up which would have made the perfect seed bed for me to broadcast my new, costly seed.
Breaking-Down Clods, and Pulverizing
As you work a field with a disk, especially if there is a little too much moisture present; you will most likely end up with sizeable “clods” in the soil. Unless you make multiple passes with your disk harrow to continue to cut up these clods, the resulting seed bed will probably be less than desirable, once again a sure-fire way to allow seed to fall between these large clumps of ground that will eventually break down with rain, ultimately covering your seed too deeply. A cultipacker rolling over clumpy ground, especially if it is allowed to dry prior to working, breaks apart and pulverizes the soil nicely. The more passes made with a cultipacker at the right percentage of soil moisture, the finer the finished product. If choosing between more passes with a disk or more passes with a packer, it would be an easy pick for me. It requires less strain on your tractor and allows you to travel faster to roll your cultipacker across the plot an extra time or two.

Covering the Seed, or Pressing it In
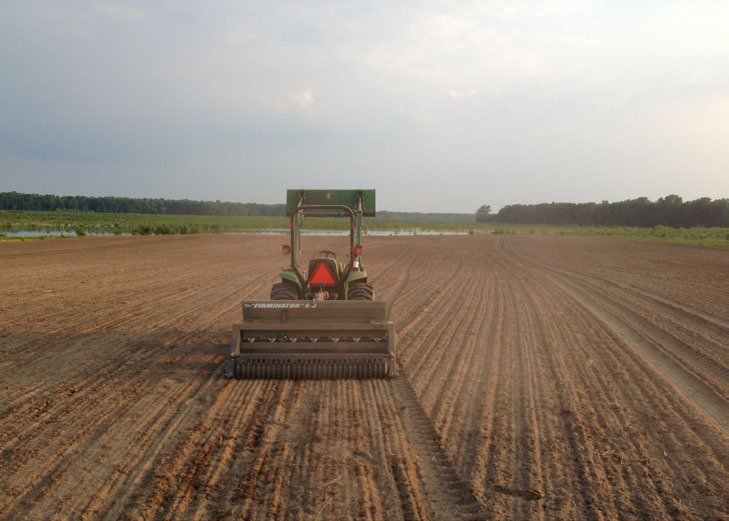
The method I recommend when using The Firminator to plant the smaller seeds is to thoroughly work up the soil with the disk first, then lean the implement back, raising the disks up off the ground, and roll over the plot prior to planting with the cultipacker to nicely firm up the seed bed. A second pass is then made metering out the seed directly in front of the cultipacker assembly which “presses” the small seed into the recently firmed seed bed. A visual analogy I use is to imagine pressing a pool ball into the sand until just the top is exposed. This, in my opinion, is perfect seed-to-soil contact for many of the smaller seeds. The newly-emerging plants have no struggle to push out of the soil, yet the root system can immediately receive soil moisture and nutrients. This can be duplicated by broadcasting your seed onto a previously-cultipacked plot, and simply rolling over it again after the seed is on the ground. For the larger seeds that must be planted deeper into the soil, the method of dropping seed onto the loose soil BEFORE cultipacking is the way to go. Once the seed is in place, a pass with the cultipacker covers the seed, presses the soil together and gives great seed-to-soil contact. You won’t get consistent depths by using this method, but I and many others that use this method get fantastic results without the need for a grain drill or an expensive planter to do the job.
Creates “Gathering Notches”
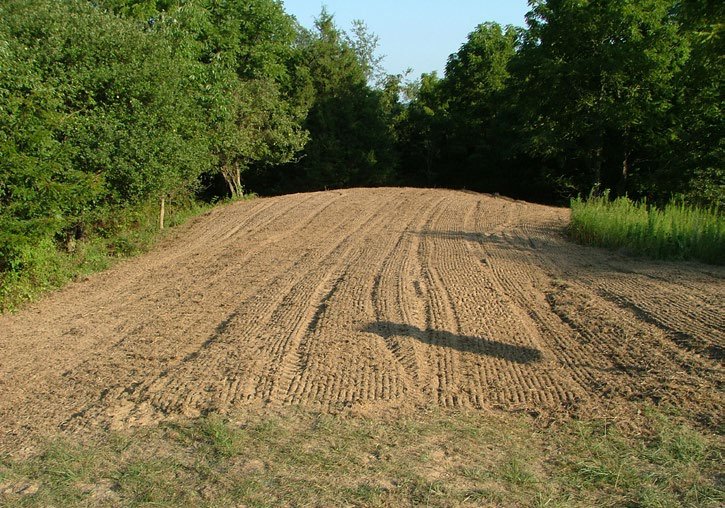
If you notice on the outer perimeter of the cultipacker wheel there are protruding serrations or teeth. These teeth create notched indentions into the soil in the bottom center of each wheel print. The benefit of these notches or indentions is that in the event of a heavy rain, the seed will actually gather into those areas and ultimately be covered by sediment. This prevents the seed from being washed away, as would be the case on flat ground, and the resulting sediment-covered seed (not too-deeply covered) germinates nicely from these shallow protective “gathering indentions”.

Sealing up of the Soil to Conserve Moisture
In areas of the country where soil moisture conservation is very critical, a cultipacker can also assist there as well. Once the soil has been thoroughly cultipacked, it tends to seal up quickly after the initial rainfall or condensation of dew dries up off the surface. This is not the case in loose, open and porous soil. The flattened, firmed surface actually creates a shallow sealed top layer that tends to prevent evaporation of soil moisture contained underneath. Turning over the top few inches of soil profile in a properly cultipacked field, which appears very dry on top, will reveal good moisture not far below. With regard to drier climates and soils that dry quickly, once the planting is properly packed and sealed up as described above, if precipitation stops and the upper soil profile eventually begins to dry out, then another advantage takes effect. Since the soil has even particle contact throughout without open porous pockets, moisture can actually be pulled up from below as it wicks easily through the even contact without interruption of air pockets. This is a very overlooked yet fundamental benefit of properly firmed seed beds and lower profile.
One thing is for sure, there are a number of you who have realized the benefits of the time proven trusty old cultipacker and the deserted ones that have been lying around in fence rows and old barn lots have been gobbled up. Older units that come up in farm auctions are quickly snatched up too. Many of these older units have been modified and cut down to a more practical size to be used by you food plot enthusiasts.
There are a few other ways to get close to the results obtained by a real cultipacker. Lawn rollers filled with water, or the old concrete style rollers will do a good job of firming the seed bed down and breaking up clods. However there are disadvantages to these too. Water-filled rollers quickly cause condensation to form during hot weather. Eventually the dry soil begins sticking to the roller, which in turn will start to pick up seed. In slightly damp soil, regular rollers can be a nightmare to keep from picking up soil and seed. Beware of what some newer food plot implement manufacturers are calling cultipackers. Many of these items are not much more than rolling steel cylinders, or some sort of a dragging device. These pieces can’t perform like the time-proven real deal that will accomplish all of the functions on our list. If you are not currently using a real cultipacker, try buying or borrowing one if possible and use it on your next venture of food plot planting and see if you don’t agree that they are indeed a big…in fact a very big deal!
BENEFITS OF A CULTIPACKER
- AIR SPACES have been removed by cultipacker
- CULTIPACKER TEETH CREATE POCKETS OF COMPRESSED SOIL FOR SEED COLLECTION
- DISKED SOIL
- CULTIPACKER CREATES A LEVEL SEED BED OF PULVERIZED SOIL
- “FIRMED” SOIL BED
- UNWORKED SOIL
ILLUSTRATION BY CHRIS HANSEN